How to
Index
Click on the topic you want to learn about. We’ll show you how to use it effectively with us.
Apps & Software
PianoClass features
Online learning preps
Recording
Apps & Software
CLICK HERE to learn how to use Google Calendar with us so you can always see all scheduled lessons and events.
Set up – on a Computer
- Go to https://calendar.google.com
- Log in with the email you provided to us.
- Save this link in your browser for easy future access.
- Go to Settings → Settings → Event settings → Add invitations to my calendar, and choose From everyone
Set up – on a tablet or smartphone
- Install the Google Calendar app
- Log in with the email you provided to us.
- Open Menu → Settings → General → Adding invitations → Add invitations to my calendar → From everyone
- Make sure you can see your lessons
- If a lesson appears with a coloured background, you’re set.
- If it’s outlined, click on the lesson, then tap “Yes” at the bottom of the event (where it asks “Going?”) for All Events.
- If you don’t see lessons, look for an email invitation from Google Calendar and confirm with “Yes.”
- If you still don’t see the lessons or can’t find the email, contact your mentor immediately.
CLICK HERE to learn how to use Google Drive with us, ensuring you always have easy access to shared materials.
Set up – on a computador
- Via Browser
- Go to https://www.google.com/drive.
- Log in with the email you provided us.
- Save the link in your browser.
- Go to Shared with me, select Type: Folders, and find your PianoClass folder.
- Click on the PianoClass folder → click on the 3 dots (right side) → Organize → Add shortcut → All locations → My Drive.
- Via Software
- After adding the folder to My Drive via the browser…
- Go to Google Drive Download and install the app for your operating system.
- Once set up, you’ll see your PianoClass folder in your File Manager.
- Google’s Support Page on accessing shared files.
Set up – on a tablet or smartphone
- Install the Google Drive app
- Log in with the email you provided us.
- Go to Shared, tap Search in Drive → Type → Folders, and find your PianoClass folder:
- Tap the 3 dots next to PianoClass folder → Add to Starred
- Tap the 3 dots next to PianoClass folder again → Add shortcut to Drive → My Drive → Add
- Google’s Support Page on accessing shared files.
CLICK HERE to learn how to use YouTube with us for watching, uploading, and organising your practice or lesson videos.
youtube.com/pianoclass – our public channel
@mypianoclass – exclusive students’ playlists and video lessons
Set up, find, add, and watch your playlist
- First Time: Setting Up
- In Google Drive, open the file PianoClass Useful Links.
- Under Access your lessons → Recorded lessons: YouTube Playlist → Click on the link.
- Ensure you’re logged into the correct YouTube account.
- Click Continue to add this playlist to your account so you can add videos there.
- If no Continue button appears, you’ve probably already added it.
- Find and Watch myPianoClass YouTube Playlists
- In Google Drive, open PianoClass Useful Links and click the playlist link, or
- On YouTube, go to You → View All Playlists → choose myPianoClass.
Upload videos to your playlist
- Upload your video to your YouTube account.
- Name the file as “YearMonthDay composer, piece – short detail.”
- Example: 20170826 JSBach, Invention #1 – first section counting beats
- Select the playlist PianoClass & [Your Name].
- Click More Options, then UNCHECK “Publish to subscriptions feed and notify subscribers,” then Next.
- Click Next again until the final page.
- Mark it as Unlisted and click Save.
Google Support page
CLICK HERE to learn how to use Zoom at its best during lessons and events.
Install and set up Zoom on ALL your devices
ON YOUR COMPUTER
Installation
- Visit Zoom Download Center and download Zoom Client for Meetings.
- Create a free account, or log in to an existing one.
Audio setup
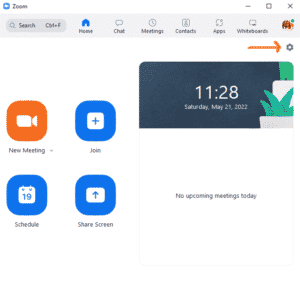
- From Zoom’s Home screen, click the Settings icon ( top right).
- On the left, select Audio.
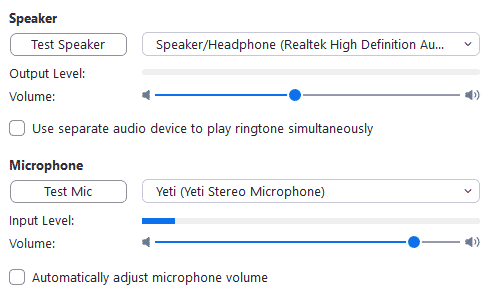
Speaker and Microphone
- Choose your speaker, adjust the volume, and test by clicking Test Speaker.
- Choose your microphone; set volume to around 80–90%, and test it.
- Uncheck “Automatically adjust microphone volume.”
Audio Profile
- Check Original sound for musicians.
- Check High fidelity music mode.
- If you’re not using headphones, check Echo cancellation; otherwise, leave it unchecked.
- Check Stereo audio.
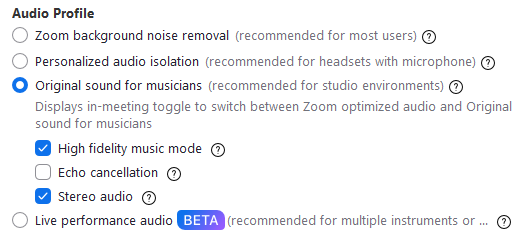
- Note: Only check Echo cancellation if you are not using headphones/earphones.
ON YOUR TABLET / SMARTPHONE
Installation
- Install the Zoom app from your App Store or Google Play.
- Create a free account, or log in to an existing one.
Audio setup
- Open the Zoom app and tap More in the lower-right corner.
- Tap Audio, then on Original Sound.
Headphones
On tablets or smartphones, only wired headphones will work for a piano lesson.
For each lesson
Revise your Setup
- On a Computer: confirm your speaker and microphone devices are set correctly (including volume).
- On a tablet or smartphone: ensure “Original Sound” is turned on.
Start your Lesson on Zoom
- At your scheduled time, use one of the following options:
- Go to Google Calendar, click on your lesson, and then on your mentor’s lesson room.
- Go to Google Drive, open the file Useful Links and click on your lesson’s link.
- Type your mentor’s lesson address in any browser.
Inside the Lesson
- Activate Original Sound:
- On a Computer: hover the mouse over the Zoom screen → at the top-left corner you will see the option to turn the Original Sound on.
- On a tablet or smartphone: roll the lower horizontal bar to find and tap on More → Enable Original Sound.
CLICK HERE to learn how to use WhatsApp with us for easy communication and engagement.
PianoClass Studio
- A WhatsApp community exclusively for our students and parents. We use it for:
- PianoClass announcements (news, events)
- Students enrolling in Special Activities
Chat with your mentor
- Send text if you’re late to a lesson, or have questions/comments.
- Send pictures for homework, fingering, or posture checks.
- Send videos (with a short context) for short passages or assigned tasks.
- Send audio only for urgent lesson-related matters.
Kids & Teens
- Students under 18 use family group chats (parents included) to keep everyone aligned.
PianoClass features
CLICK HERE to learn how to use the Students’ Exclusive Area.
(soon)
CLICK HERE to learn how to watch, enrol, and participate in our Special Activities.
Watch from Libraries
- Log in
- Visit the Special Activities Library
- Choose one Library from the Index
- Watch as many videos as you want
Enrol and participate in live events
- Confirm your attendance by following the event’s instructions in the PianoClass Studio community on WhatsApp.
- Join the meeting platform at the scheduled time.
- Depending on the event, you may play, speak, or chat.
Play in a MasterClass
- Plan it with your mentor.
- Schedule a slot.
Play in the PianoClass in Concert
- Choose your piece(s) with your mentor and record them.
- See instructions under Recording → for an online concert.
- Send us your recordings at least one month before the concert.
Schedule a Technical Rehearsal
- Once a year, you may schedule an individual Technical Rehearsal with your mentor.
Engage in a LivingArt event
- It all happens in the PianoClass Studio on WhatsApp.
- Confirm your participation under the event’s post.
- React or reply with comments or links.
CLICK HERE to learn how to use our Follow-up.
Your instructor will review Follow-up messages during business hours, replying within 2 PianoClassON days (often sooner).
Topics
- Quick questions
- Short passage checks
- Sharing discoveries or issues to address in the next lesson
Messages
- Text
- Ask about practice details or clarifications on what was said in your last lesson.
- Keep it clear and concise.
- Audio
- Send short audio clips of piano passages only.
- Always provide a brief text to explain the context.
- Video
- Show short passages to illustrate a question or comment.
- Include the piece name and measure numbers if relevant.
- Add a short text for context.
- Image
- Send images of written work or fingering.
- Include a short text explaining the image.
PianoClass for Kids
- With Mentor Support, you have two Follow-ups per lesson (unless told otherwise in the lesson).
CLICK HERE to learn how to use our Office Hours.
Topics
- Plan your repertoire or musical objectives.
- Verify specific repertoire passages.
- Discuss other musical matters.
Enroling
- Visit the Office Hour Calendar and enrol in your mentor’s next available Office Hour.
- You can enrol 7 days to 24 hours in advance.
Attending
- Study or research before the Office Hour.
- At the scheduled time, go to your mentor’s meeting room.
What else should I know?
- Up to 3 students may join each 25-minute slot.
- Available for piano students with an annual plan and at least 50-minute weekly lessons (live or recorded).
CLICK HERE to learn how to handle a lesson you cannot attend.
Have a recorded lesson
Your lesson will be recorded at your scheduled time.
- Send a WhatsApp message to your mentor, stating you want a recorded lesson.
- Upload up to one-third of your lesson’s time in videos to your personal YouTube playlist.
Use your practice recordings or record yourself as if you were in a live lesson, showing tasks, repertoire, and any questions or comments.
Try to reschedule your lesson
Do it as early as possible—it depends on your mentor’s availability; preponing is always better than postponing.
Remember:
- Each lesson can only be rescheduled once, any time before or up to 10 days after the original date.
- Do not reschedule it for the same day as another lesson (unless your mentor advises otherwise).
- Give yourself practice time between lessons.
- If a slot is free but the time doesn’t suit you, schedule it as a Recorded Lesson.
- Single lessons can only be preponed, never postponed.
Use the Follow-up & Office Hours
If neither recorded nor rescheduled works, keep practising and use the Follow-up to get feedback.
If bigger questions arise, enrol in an Office Hour.
Learn from our Libraries, your YouTube playlist, and our blog
- Explore our Libraries for essential and deeper learning.
- Watch relevant recorded lessons in your playlist.
- Check our blog for musical and artistic insights.
Online learning preps
CLICK HERE to learn how to avoid embarrassment and ensure an efficient lesson.
What is Netiquette?
It combines “Network/Internet” and “Etiquette”—a set of guidelines to help people from different backgrounds communicate smoothly online.
In your lesson Room
Set up wherever you like, ensuring good visual and audio for both you and your mentor.
Image
- Respect your home’s privacy (avoid showing personal, messy areas, and people passing by).
- Good lighting on your face and keyboard is crucial.
Sound
- Close windows, turn off TVs or other audio sources. We want your music room as quite as possible.
- Inform others they may be overheard.
- Don’t scrape or shout near the mic—it can be painfully loud for your mentor.
By following these guidelines, you will optimise your concentration and your teacher’s, who is looking for all the little nuances in your performance.
Be ready for your lesson
Equipments
- Charge devices (smartphones, tablets, earphones)
- Keep your computer plugged in.
Room and Materials
A few minutes before:
- Close windows, turn on lights, let others know to remain quiet.
- Gather music materials (pencil, eraser, paper/tablet, earphones).
- Turn off extra apps/devices to maximise your internet stream and computer performance.
- Adjust your bench height and have foot support if needed.
- Drink water, go to the toilet, wash your hands, and do whatever more you need to avoid interrupting the lesson later.
Kids
For under-12 students, a responsible adult should be ready to assist with any technical or behavioural issue.
The adult can take notes but should only participate when the mentor requests.
We also need a direct WhatsApp contact with that adult.
Schedule
- Set two alarms:
- ~10 minutes before to prepare, and
- ~1 minute before to enter your Zoom lesson
Before the lesson
Arrive by your piano about 10 minutes before your lesson time. This will give you time to prepare and even practice a little.
Starting the lesson
- Go to the Zoom meeting at ~1 minute early.
- If you have any technical issues, write right away to your teacher via WhatsApp.
Being late
- If you know you’ll be late, inform your mentor via WhatsApp.
- Without a notification, they’ll wait up to 10 minutes.
End of the lesson
- Lessons end on time.
- If you need extra help, bring it up at the start of a lesson, via Follow-up, or in an Office Hour.
Communication
- Greetings: A simple “hello” checks that audio works.
- Speech or gesture: Verbally respond so your mentor knows you heard them; subtle gestures can be missed.
Use polite words and refrain from slang/swearing. - Absence and return: If you step away, mention it, and speak up when you’re back so your mentor knows you’ve returned.
If they are playing, interrupt them. It is your lesson time and not a concert.
CLICK HERE to learn how to prepare for your 1st Online Live Lesson: equipment, software, and positioning
What do you need?
Piano
- A well-tuned acoustic piano is best.
- An 88-key digital keyboard can also be used initially.
Stable Internet connection
- Connect a computer via Ethernet if possible. If using Wi-Fi, remove obstacles between your device and the router.
- Test your speed at speedtest.net. We recommend:
- ping below 20 ms
- download above 15 Mbps
- upload above 10 Mbps
At PianoClass, our results are:
ping: 2 ms || download: 900 Mbps || upload: 400 Mbps
Computer
- Must have a built-in or external webcam (you can add multiple cameras).
- An external microphone (USB) captures music more accurately. (Blue Yeti or Fifine K669B recommended.)
- If needed, you can use a tablet or smartphone, but a computer typically offers better control over audio and camera.
Earphones
- Test them by playing the piano with earphones on. You must still hear yourself clearly.
- Avoid noise-cancelling or fully closed-back designs.
- Wired earphones always work (we recommend 3m cable or extension).
- Bluetooth earphones: feasible on a computer, never for tablets or mobiles.
Zoom
- Install, sign in, and follow our Zoom setup instructions on every device you might use.
Learning Material
Have all lesson resources and materials close at hand, printed and/or on Google Drive.
Digital – tablet
- Install Google Drive app + PDF editor (e.g., PDF Expert) for annotation.
- Your mentor may suggest other apps for sheet music, orchestral backing tracks, reading and rhythm practice, and more.
- Keep it always charged and ready to be charged during the lesson.
- Use a digital pen/pencil for easier and faster annotation.
Printed
- Print any shared files from Google Drive and keep a pencil/eraser/paper nearby for lessons and practice.
- Be ready to print new materials as requested by your mentor.
- Also, ensure access to Google Drive, preferably on another device.
How to position your devices?
Camera
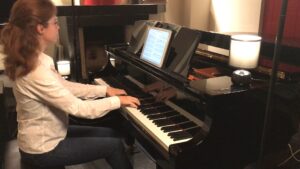
- Place your main camera at the piano’s side, capturing your face, arms, and upper bench area.
- Make sure the entire keyboard and your posture are visible.
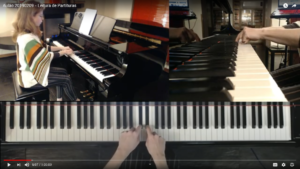
- Extra cameras can show different angles (top view, hand close-ups, etc.), but they are not mandatory.
Monitor
- Position it where you can glance at your mentor even while playing.
Microphone
- Aim for a balanced pickup of your voice and the piano.
- Test it on a Zoom call with a friend, a short recording, or wait for feedback from your mentor in a Technical Rehearsal.
Lighting
- Use bright lighting behind (not in front of) the camera and towards you.
- Good lighting improves overall visibility.
Useful tips
- Keep the computer plugged in; charge smartphones/tablets/earphones in advance.
- Double-check you can access Google Drive.
- Have a way to take notes (paper or digital).
- Feel free to record your own lesson for personal review.
- Make sure no one else is using your internet (e.g., streaming, video calling) during your lesson.
𝗖𝗟𝗜𝗖𝗞 𝗛𝗘𝗥𝗘 and learn How to prepare for your 1st Video Lesson: Equipments, software and positioning
What do you need?
Piano
- A well-tuned acoustic piano is best.
- An 88-key digital keyboard can also be used initially.
Internet connection
- You only need enough bandwidth to upload/watch HD or Full-HD videos.
Devices to record your lesson
Choose the setup that’s most comfortable for you:
Smartphone/Tablet
- Position the device to capture the entire keyboard and yourself from head to toe.
- Ensure the mic picks up your piano sound and your voice clearly.
Computer
- Use a recording program (e.g., OBS Studio) or Zoom.
- An external microphone (Blue Yeti, Fifine K669B, etc.) is recommended for better sound quality.
- You may add additional cameras for multiple angles, if you prefer.
Devices to watch the lesson
- You can watch on any device: phone, tablet, computer, or Smart TV.
- For best results, use quality audio (earphones often help) and a sufficiently large screen.
Learning Material
Have all lesson resources and materials close at hand, printed and/or on Google Drive.
Digital – tablet
- Install the Google Drive app + PDF editor (e.g., PDF Expert or Adobe Acrobat) for annotation.
- Your mentor may suggest other apps for sheet music, orchestral backing tracks, reading and rhythm practice, and more.
- Keep it always charged and ready to be charged during the lesson.
- Use a digital pen/pencil for easier and faster annotation.
Printed
- Print any shared files from Google Drive and keep a pencil/eraser/paper nearby for lessons and practice.
- Be ready to print new materials as requested by your mentor.
- Also, ensure access to Google Drive.
How to position your devices?
Camera
- Place your main camera at the piano’s side, capturing your face, arms, and upper bench area.
- Make sure the entire keyboard and your posture are visible.
- Extra cameras can show different angles (top view, hand close-ups, etc.), but they are not mandatory.


Monitor
- Position it where you can glance at your mentor even while playing.
Microphone
- Aim for a balanced pickup of your voice and the piano.
- Test it in advance with a friend, a short recording, or wait for feedback from your mentor in a Technical Rehearsal.
Lighting
- Use bright lighting behind (not in front of) the camera and towards you.
- Good lighting improves overall visibility.
Sending Videos to Your Mentor
- Upload them to your PianoClass YouTube Playlist following our steps on How to use YouTube.
- Make sure each video name clarifies what it’s about or which piece you’re playing.
Where Will My Video Lessons Be?
- Each student has a personal YouTube playlist (link in Google Drive).
- Both you and your mentor add videos here, so it’s all in one place.
- Your first sample lesson or orientation clip might already be there.
Learn more about YouTube and our playlists on How to use YouTube.
Useful tips
- Record naturally, as if your mentor were present.
- Show final results plus any questions or tricky sections. Comments are always welcome.
- You can record one continuous video or separate clips by topic.
Recording
CLICK HERE to learn how to record a video for Follow-up.
Using a smartphone
- Ensure the recording is not mirrored.
- Record in landscape mode.
- Hold your phone, place it on a stable surface, or use a tripod.
- Record, then send the video via WhatsApp to your mentor, adding a short context message.
CLICK HERE to learn how to record a video for your own practice.
Keep it simple
- Use whatever device is handy.
- Record and watch immediately.
- Note what worked vs. what needs improvement.
- Pick practice strategies for the issues you identified and write them down.
- Use these notes next time you practise.
Keep it organised
- Delete videos you don’t need.
- Create a phone album or folder for keepers.
- Periodically move your best takes to a long-term album/folder.
Tips for recording with your SMARTPHONE
- Make sure it’s not mirrored.
- Use landscape orientation.
- Hold it with one hand or place it on a table, a tripod, or the piano (right after the keys).
- Hit record and review.
Tips for recording with your COMPUTER
- Use your usual lesson setup.
- On Zoom, open a New Meeting → Record/Stop for each segment. Files save automatically when you exit.
- Or any other recording software (like OBS).
CLICK HERE to learn how to record a video for an online concert.
Equipment
- Devices: You can use one or multiple devices (smartphone, tablet, or computer).
- Optional Add-ons:
- External camera(s), for additional angles of your playing
- USB microphone (like Blue Yeti or Fifine K669B) for higher sound quality
Software
- Smartphone/Tablet: Use your default camera app or any reliable recording app.
- Computer: We suggest OBS Studio (free, reliable) or even Zoom in a personal meeting mode.
Settings
Do your best to set your device(s) as follows:
- Camera
- Frame Rate: 30 fps (frames per second)
- Video Resolution: 1920 × 1080 (Full HD)
- File Format: MP4 if possible
- Mirroring: Make sure the image is not mirrored when you play back the video.
- Sound
- Ideal: 24-bit / 96 kHz for best quality (if you’re using advanced mics or interfaces).
- Simple: If you’re recording with a basic device (phone/tablet camera app), it will probably choose settings automatically.
- Separate Audio: If you do record audio separately (for instance, with a USB mic and a computer), saving it as a .wav is recommended.
Positioning & Testing
Prepare and test it at least a few days in advance to not worry about it when recording
- Landscape Orientation
- Lay your phone/tablet horizontally, or set the computer’s camera to wide mode.
- Stability
- Use a tripod, music stand, or stable surface so the camera doesn’t shake.
- Full View
- Capture your head, arms, and the entire keyboard. Make sure your hands and keys remain in view.
- Lighting
- Bright lighting from behind the camera, not behind you. Avoid harsh backlight or shadows.
- Noise Control
- Make sure the environment is quiet—turn off fans, TV, etc.
- Sound Test
- Record a short snippet (soft to loud playing). Replay it to check if your piano sound is clear and not distorted.
- If possible, send a quick sample to your mentor to confirm.
Last Guidelines
- One Take
- Perform each piece in a single, continuous recording (no editing or splicing).
- When using multiple recording devices, record the sound on them all.
- Wait 5 Seconds
- After you start recording, hold a calm posture for ~5 seconds before playing. Do the same at the end. This helps with editing and gives a neat start/finish.
- Silence
- Make sure nobody talks or moves around around you.
- Dress Appropriately
- Choose an outfit you would wear for a live stage performance (or what suits the event’s style).
Send Us Your Files
- File Size
- If each recording is under 2 GB, you can use WeTransfer
- If each recording is under 5 GB, you can use TransferNow
- In both cases, send it to your mentor’s email address.
- Keep a Copy
- Always store your final video on your computer, phone, or external drive for your own records.
If you have any doubts, ask your mentor for help or a quick test session before finalising your recordings.
CLICK HERE to learn how to record a video for a Spoken Introduction
The Scene
- Quiet Location
- By your piano, or a calm spot at home. No background noises or distractions.
- Stable Camera
- Use a tripod or set your phone/tablet horizontally on a firm surface (landscape position).
- Lighting
- Make sure your face is well-lit from the front. Avoid backlighting that puts your face in shadow.
- Dress up
- You may wear the same clothes chosen for your performance or something different.
What to Say
- Who You Are
- “My name is __; I’m a PianoClass student, and I’m excited to share this piece with you.”
- Tell us who you are and why you’re playing today.
Think of what you’d like to hear if there was another pianist presenting herself to you and wanting you to listen to her playing right after.
Try to make it as clear, simple and natural as possible.
- Piece Introduction
- Title, composer, and any historical or personal detail that might interest listeners.
- Paint the main ideas of your repertoire in the audience’s mind with words.
You’ll be preparing them to better understand your music and therefore really enjoy it.
You may present some short historical or technical facts, but be sure to have them connected to your own view and interpretation of the music.
- Personal Connection
- Mention what you love about the piece—its mood, story, or special techniques.
- Keep It Honest, Simple & Clear
- The most important aspect of this introduction is that the listener could see a picture in his mind, imagining the scenes you’re describing. Use words that relate to the senses (sounds, images, feelings, smells, tastes, sights, temperatures, …). Show a story instead of just telling it.
- Example Starters
- I’m … / My name is … /
- The piano to me … / It all started …
- I’ll play … / I’ll perform … / “John Doe” wrote the piece “this and that” inspired on …
- The part I most like … / each time I play this piece I think about …
Last Speech Guidelines
- Speak Clearly
- Use a normal, confident voice.
- Take your time to breathe, and don’t rush.
- Test Audio
- Record a short clip and replay it to ensure your voice is loud enough and not echoing.
- One Continuous Take
- Start recording, wait a moment in a calm pose (at least 5 seconds), and then speak. Pause again after you finish for about 5 seconds.
- External mic
- If you have an external microphone (lapel mic, earphones with mic, …) to place near you, use it, as the sound will be much better.
Send Us Your Files
- File Size
- If each recording is under 2 GB, you can use WeTransfer
- If each recording is under 5 GB, you can use TransferNow
- In both cases, send it to your mentor’s email address.
- Keep a Copy
- Always store your final video on your computer, phone, or external drive for your own records.
If you have any doubts, ask your mentor for help or a quick test session before finalising your recordings.
